Click this ICON to retrun to design editing mode and open Design Editing Toolbar
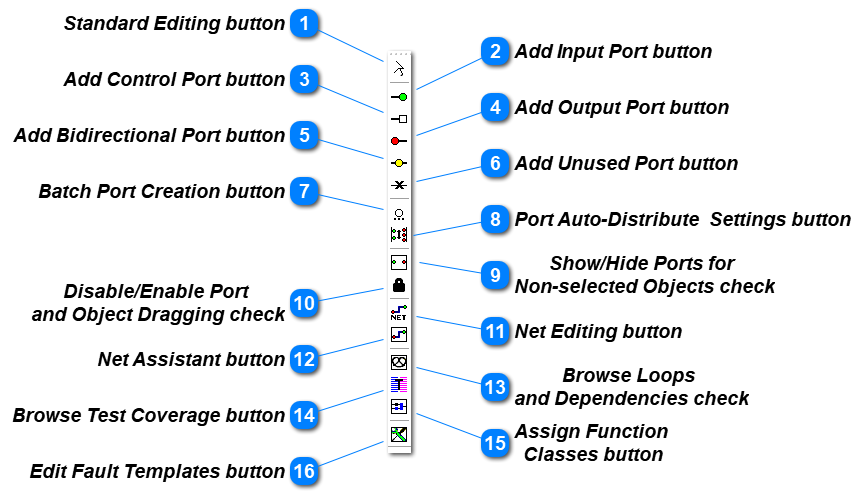
In Standard Editing Mode, the Design Editing toolbar (depicted below) contains icons that can be used to addportstoobjects, or to invoke useful editing modes. By default, the Design Editing toolbar is displayed vertically on the far left side of the eXpress program window (although, like other toolbars, the Analyst can change its location).
The following operations can be invoked using icons on this toolbar:
Note: The various "Add Port" icons (including "Batch Port Creation") are only enabled when one or more objects are highlighted in the main design window. Also, the icon is All Nets Editing Mode disabled when the active design contains no objects.
Standard Editing button
Standard editing for selecting of objects, ports and nets in the design.
Add Input Port button
Add an input port to the selected object. (See Add Ports)
Add Control Port button
Add a control port to the selected object. (See Add Ports)
Add Output Port button
Add and output port to the selected object. (See Add Ports)
Add Bidirectional Port button
Add a bidirectional port to the selected object. (See Add Ports)
Add Unused Port button
Add an unused port to the selected object. (See Add Ports)
This icon on the Design Editing Toolbar is used to “Disable/Enable Port and Object Dragging” within the main drawing window. When dragging is enabled (the default state in which the icon depicts a black padlock), if you hold down the Ctrl key on the keyboard as you click on the icon, eXpress will enter a new mode where port dragging is allowed, but object dragging is not. In this mode, the icon will depict a gold padlock, rather than a red one (the color used when both object and port dragging has been disabled). Note: To transition from the “red” (objects & ports locked) mode to the “gold” (objects locked) mode, you must first switch back to the “black” (nothing locked) mode.