Within a design state definition, each object state can have one of the following three settings:
Icon
Setting
Meaning
included
enabled (unless excluded from another active design state)
excluded
disabled, even if included in another active design state
non-included
disabled, unless included in another active design state
Exception: When a design state is set up to include unselected states, then non-included states (with an empty checkbox) will be enabled, unless they are explicitly excluded from another active design state.
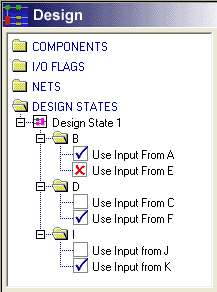
Depicted below is an example design state definition with all three types of object state selections. The Analyst can select whether a state is included, excluded or non-included by clicking repeatedly on the corresponding check-box within the Explorer Tree. For objects with mutually-exclusive states, a state cannot be marked as non-included (an empty checkbox) in this manner—instead, the Analyst must clear the object state setting.
"Design State 1" (depicted at left) contains the following object state settings:
3 included states
1 excluded state
2 non-included states
How to Edit an Object State Setting within a Design State
1
In the Explorer tree, expand the design state to be edited by clicking on the plus sign to the left of the design state name.
2
To include or exclude a particular object state, click on the corresponding checkbox until the desired icon appears. Note: to reset the checkbox so that it is non-selected (empty), you must clear the object state setting.
Alternative: Right-click on the object state entry in the design state definition and select the desired setting from the pop-up context menu.