Attribute-Based Detection and Isolation Priorities
You can now use an Attribute Test limit to control the order in which detection and/or isolation tests are selected within a diagnostic study. To do this you must first define an integer test Attribute. Next, assign priority Test limits to tests using this Attribute. Tests assigned a lower number will be selected before tests with a higher number (e.g., priority 1 tests will precede priority 2 tests in the detection order). Tests assigned a priority of zero will be selected after all tests with an assigned non-zero number have been performed. Finally, you can exclude a test from diagnostics by assigning it a negative priority.
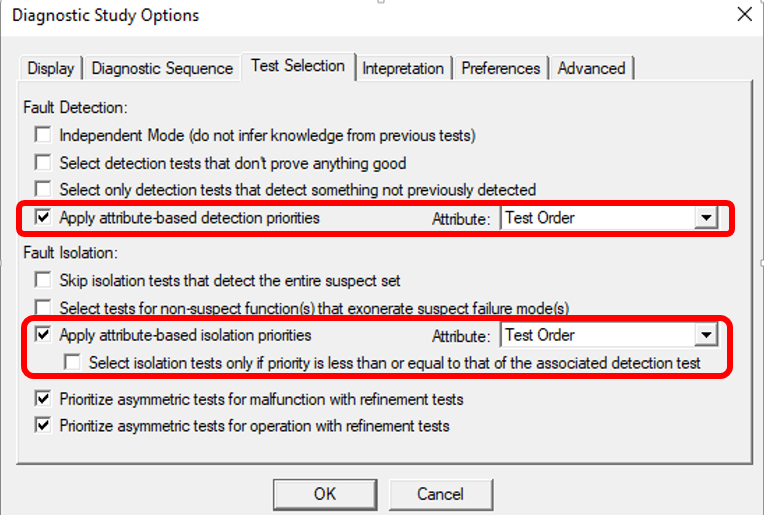
On the "Test Selection panel" of the Diagnostic Study Options dialog there are new checkboxes allowing you to enable priority-based test selection.
To enable priority-based detection, enable the “Apply Attribute-based detection priorities” checkbox and then select the Attribute containing the detection priority.
Isolation priorities can be set up in the same way. You can use the same Attributes for both detection and isolation priorities, or you can use a different Attribute for each.
There are various scenarios where this new capability will be very useful. When you wish to perform tests in a specific order, you can simply assign a different priority number to each test. In previous versions of eXpress, this had to be handled using prerequisites or weightings. Priorities are much easier!! Also, if you want to control the order in which different categories of tests are selected by the diagnostics, then you can assign a different priority number to the tests in each category. For example, if you wanted to make sure that “power-up” BIT is performed before all other tests, you can simply assign priority 1 to all power-up BIT and then calculate diagnostics using detection priorities. In previous versions of eXpress, this could be accomplished using the “Extend Detection” feature, but you would always have to generate the diagnostics in stages.
When both detection and isolation priorities are used, there is an additional option (located immediately under the checkbox used to enabled Attribute-based isolation probabilities). This “Select isolation tests only if priority is less than or equal to that of the associated detection test” option is particularly useful if tests are run in batches until a failure is detected. With a different priority assigned to each batch, you can use this option to ensure that tests that have not yet been performed are not used to isolate a detected failure.
When used, test priorities take precedence over all other test ordering methods except test prerequisites. So, in models where test prerequisites have been defined, you may find that the assigned priority numbers end up being more of a guideline than a hard-and-fast rule.
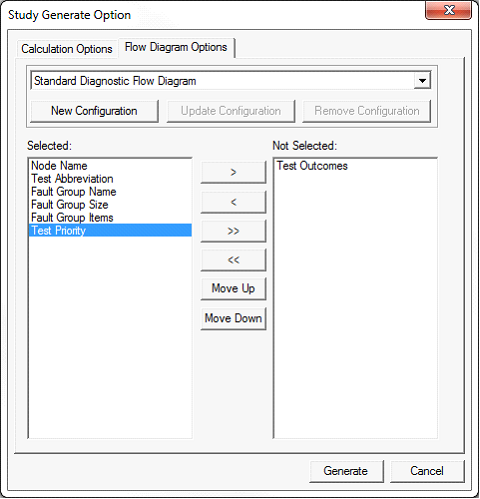
You can display the assigned test priorities in the Diagnostic Flow Diagram by adding “Test Priority” to the selected fields on the Flow Diagram Options panel of the Study Generate Options (aka “meat grinder”) dialog.
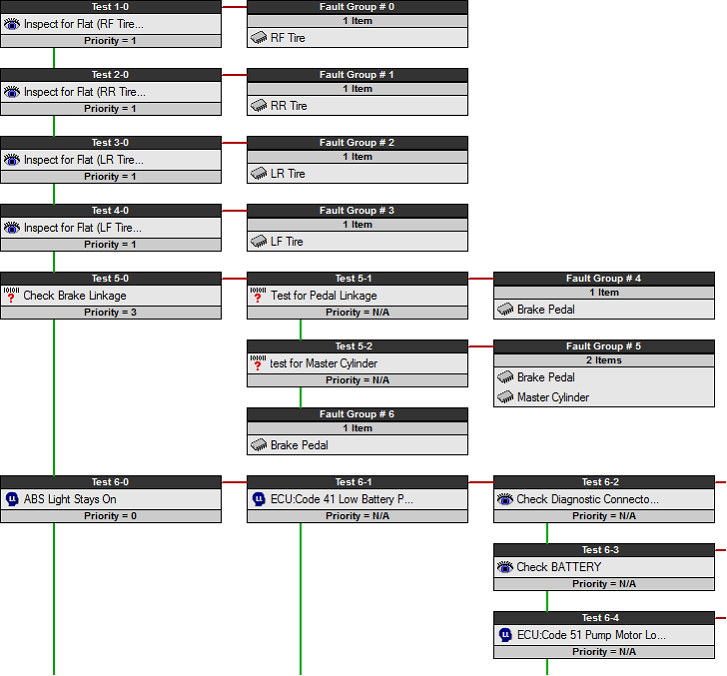
The following sample Diagnostic Flow Diagram lists the priority in each test cell:
Notice that detection tests with priority 1 were performed before the test with priority 3. After all of the assigned detection priorities were used, the tests with priority 0 were selected to complete the detection sequence. Also notice that the priority is listed as “N/A” for isolation tests. This is because isolation priorities were not used for this example.