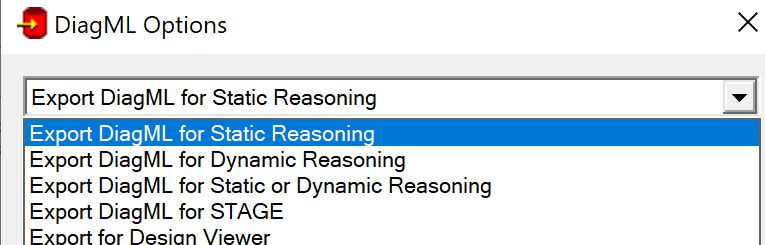
When you export diagnostics that utilize multiple-outcome tests to DiagML, up to three sections of the exported DiagML file may be affected (depending upon whether you are exporting for Static Diagnostics or Dynamic Diagnostics).
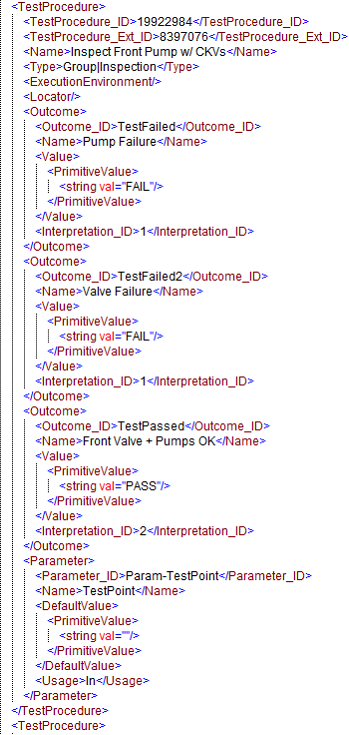
In the exported test procedures (shown at left), an <Outcome> element is defined for each pass/fail outcome of the test. This has always been the case in DiagML; the difference is that, in the past, eXpress would always export two <Outcome> elements per test (one for “Pass” and one for “Fail”). Now, for multiple-outcome tests, an <Outcome> element will be created for each subtest—plus one more to represent the “Pass” outcome.
The <Outcome_ID> for each outcome is still assigned by eXpress (in this example, the IDs for the three outcomes are “TestFailed”, “TestFailed2” and “TestPassed”).
Within each <Outcome> the <Name> element is filled out with the corresponding outcome label from the eXpress model (if no label has been assigned, then <Name> field is set to the subtest abbreviation).
Static Reasoning Export
When you export diagnostics to DiagML for static reasoning, then additional <NextStep> elements will appear in the <DiagnosticStep> associated with each multiple-outcome test.In the example at right, notice how there is a <NextStep>record for each outcome ID in the test procedure above.
Dynamic Reasoning Export
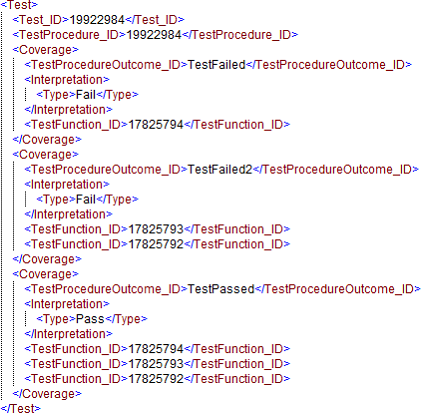
When you export to DiagML for dynamic reasoning, then test coverage is exported separately for each outcome. In the example at left, a <Coverage> record has been exported for each defined outcome of the test. Listed within all <Coverage> blocks whose <Interpretation><Type> is set to “Fail” are the functions and failure modes that should be indicted when the test produces this outcome. The exported coverage for the “Pass” outcome lists all functions and failure modes that should be exonerated (removed from suspicion) when the multiple-outcome test passes.
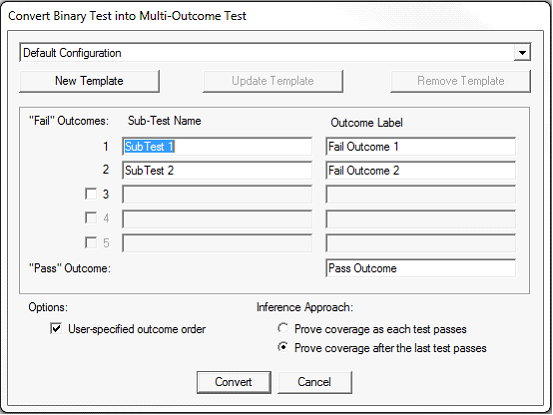
Although the eXpress DiagML export was modified to support multiple-outcome tests, the DiagML schema was able to handle multiple-outcome tests without any changes. Third-party software that parses DiagML should be reviewed, however, to ensure that it does not assume that only binary test outcomes are represented in an exported DiagML file. A new operation has been added to eXpress that helps you convert a given binary test into a multiple-outcome test. Simply right-click on a test in the Explorer Tree and select “Convert Binary Test into Multi-Outcome Test…” from the pop-up menu. The following dialog will then appear:
This operation can be used to create multiple-outcome tests with up to five outcomes (six, if you count the “Pass” outcome). Simply enter the name to be used for each sub-test abbreviation, along with the corresponding outcome label. You can also edit the “Pass” outcome on this panel. Finally, select the desired settings at the bottom of the dialog and click on the “Covert” button to create a Multiple Outcome group test. Grouped within the new multiple-outcome test will be one copy of the original test for each outcome specified on the dialog. You must then edit the coverage of each subtest to represent the diagnostic conclusions associated with that outcome.
If you find yourself defining the same outcomes repeatedly for different tests, you may want to save a configuration using the “New Template” button at the top of the dialog. Then, when you want to apply that configuration to a new test, you need only select that configuration from the drop list at the top of the dialog.
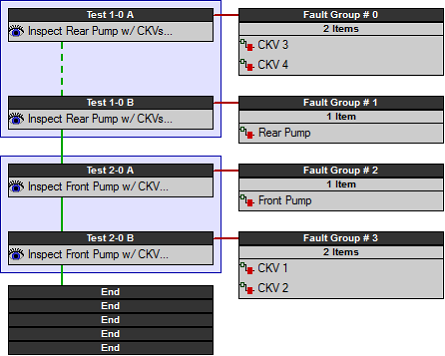
One last thing about multiple-outcome tests: although multiple-outcome tests are displayed as individual nodes for each outcome (surrounded by a blue box) in the Diagnostic Flow Diagram, the entire test is represented by a single entry in the Detection List.
In the example at left, two multiple- outcome tests (each with two failure outcomes) are used for fault detection. Notice how, in the Diagnostic Flow Diagram, all four outcomes are displayed. You can remove an individual outcome by right-clicking on that outcome and selecting “Remove Detection Test” from the popup menu.
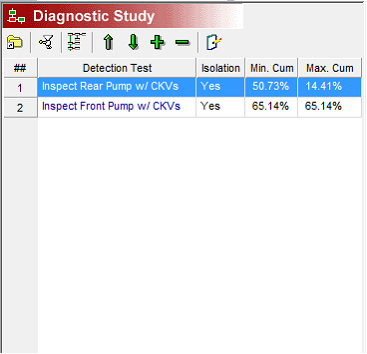
In the example at right, you can see how this same test sequence is represented in the Detection List using only two entries—one for each multiple-outcome test. If you were to move one of these entries up or down in the list, then all outcomes of that test would be moved. Also, if you add or remove multiple- outcome tests using the Detection List, then all outcomes of that test are added or removed from the diagnostic test sequence. This allows you to more quickly manipulate the test order when a custom detection sequence is desired.