Editing and Manipulation of Test Interference
Feature Description
Several major enhancements have been made to the interference capability within eXpress. Most noticeably, interference items are now color-coded (brown) during test editing:
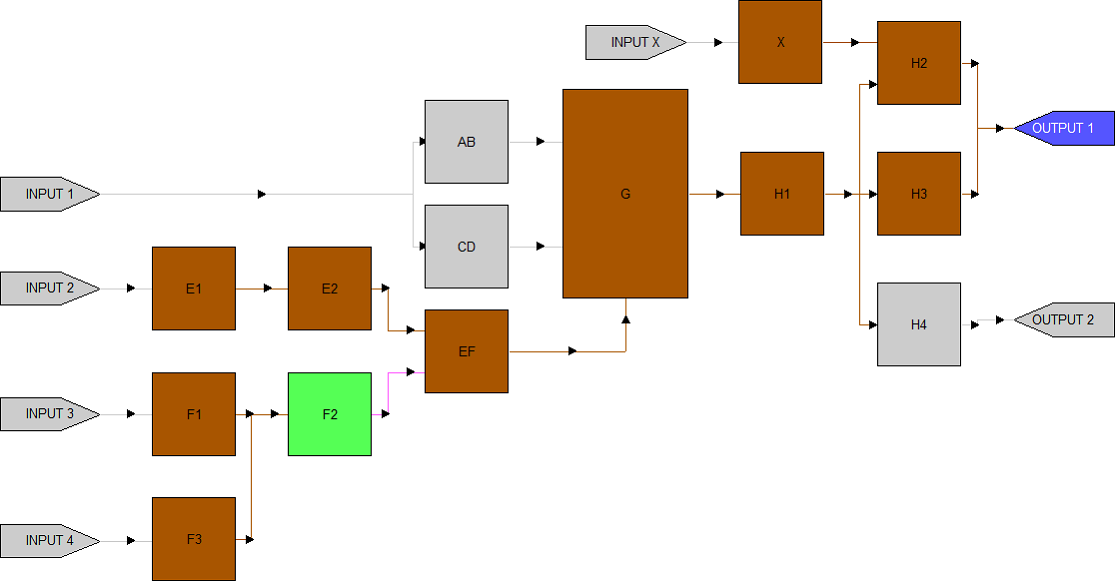
The above example depicts a signature test that looks at OUTPUT 1 to determine whether the function on box F2 is good. If the test passes, F2 is proven good; if the test fails, then by default everything upstream from the test point is called into suspicion via interference. In earlier versions of eXpress, the only way to verify this would be to create a diagnostic study and then calculate diagnostics using only this test. Now you can see this without having to generate diagnostics— the calculated interference for each test is colored brown in the design window during test editing.
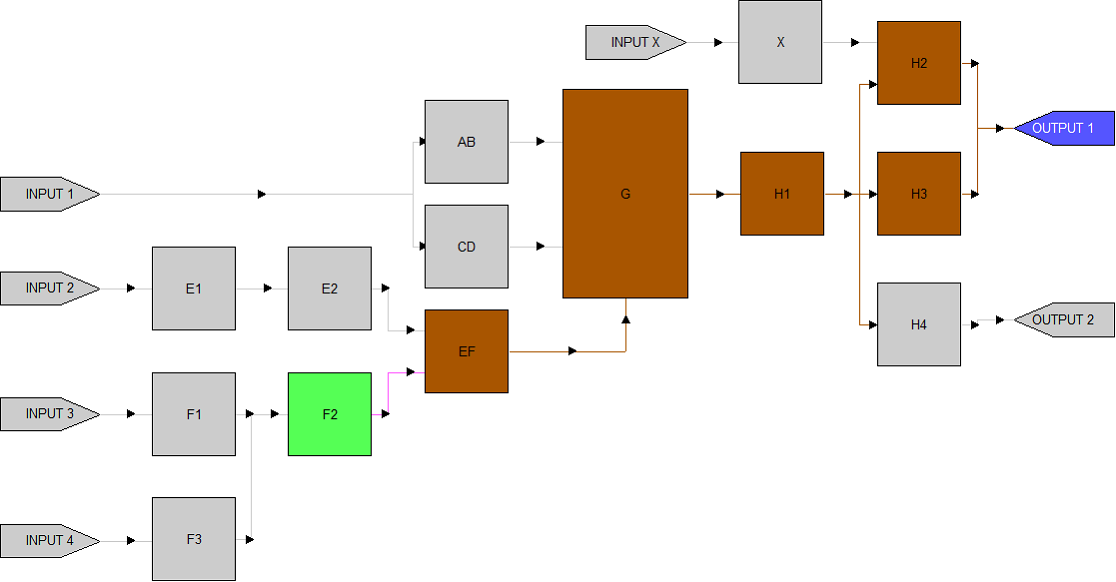
If you change the settings for a test on the Test Interpretation panel, the results will immediately be depicted on the screen. So if, for the sample test depicted above, you were to disable creation interference, boxes F1 and F3 would no longer be color-coded brown in the design window. If you were also to disable observation interference for this test (so that boxes E1, E2 and X are no longer included in the test’s interference), you would see something like this:
In previous versions of eXpress, this was all you could do with interference on a signature test (and even that you would not see until you run the diagnostics). In eXpress 6.2, however, you can now mark individual elements as being non-interference (or as extended coverage, if these elements can be inferred to be good when the test passes).
Here, object EF has been marked as extended coverage (identified by its dark green color during test editing). This means that this element (which was initially identified as interference) can be inferred to be good if the test were to pass. Object H2, on the other hand has been removed from the interference altogether (and is subsequently colored a darker shade of gray). This means that this element cannot malfunction in a way that would cause this test to fail.
So if this test were to be performed during diagnostics, F2 and EF would be proven good if the test were to pass and F2, EF, G, H1 and H3 (but not H2) would be indicted if the test were to fail.
This ability to modify the interference for individual elements greatly simplifies the process of converting enumerated coverage into actual diagnostic conclusions. To make this practical, we’ve also added the ability to define and edit a test’s interference in terms of failure modes (in previous versions of eXpress, this was only possible for functions). So, to resolve a test’s interference, the diagnostic engineer can now sit down with a test engineer and ask them two simple questions:
1) When this test passes, can any of the elements that are listed as interference for this test be inferred to be “good” (for functions) or eliminated from suspicion (for failure modes)?
2) Which of the elements that are listed as interference can actually cause this test to fail if they were to malfunction (for functions) or occur (for failure modes)?
The test’s interference can then be easily edited to reflect the answers to these questions. In a future version of eXpress, we hope to make this process even easier. A feature is planned that will export test coverage and interference to an Excel spreadsheet. The data in the spreadsheet could then be edited to reflect the answers to these two questions and then imported back into the eXpress model.
|
Extended Coverage and Interference Folders
Although, during test editing, changes to a test’s coverage and interference can be made by highlighting items and then clicking on the appropriate checkboxes on the Test Coverage panel, changes to both coverage and interference can also be made using right-click menus in the Explorer Tree which, during test editing, may now include folders for “Extended Coverage” and “Interference”.
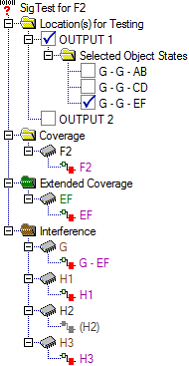
The example at right shows how the Explorer Tree would look when editing the test depicted above. The specified coverage (function F2) is listed in the Coverage folder. We can see that function EF has been converted to extended coverage and that H2 has been marked as non-interference. Functions G, H1 & H3 constitute the actual interference for this test.
|
|
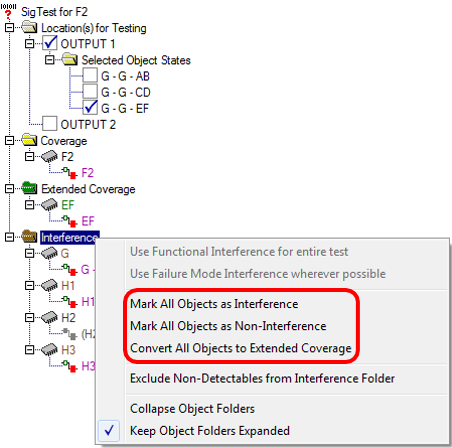
You can batch-edit interference for a test by right-clicking on the Interference folder and selecting one of the operations that apply to all of that test’s interference items.
Similar menus appear when you right-click on individual items in the interference list, or when you right- click when one or more individual functions or failure modes are selected in the Interference folder
.